Pay In
Receiving Payments (Generating Invoices and Links)
The system supports two categories of Pay In: Fiat and Crypto.
1.1 Pay in Fiat (Static Invoice Generation)
Pay In Fiat generates a static payment link typically supporting fiat currencies like the Indonesian Rupiah (IDR). This method does not support adding multiple items or discounts.
- Navigate to Payments: Access the system dashboard and select the Payments module.
- Initiate Invoice: Click Add and select Create Invoice.
- Select Currency: The supported fiat currency, such as IDR, should be selected by default.
- Enter Details: Enter the required Order ID and the payment Amount. Note: The minimum required amount for IDR is 2,00,000.
- Save and Generate: Click Save to create the invoice and generate the payment link.
Pay In screen showing 'Add' button and 'Create Invoice' option
- Share Link: Copy the payment link and share it with the customer. The link will expire after one day (24 hours).
Generated payment link and copy/share details
- Payment Reception: Once the external party uses the shared link or scanner to pay the IDR amount, the funds are deposited into the IDR wallet.
- Check Status: The invoice status will update to Paid (if the full amount is received), Partially Paid (if only some amount is received), or Not Paid (if the link was generated but no amount was paid).
- Editing Restriction: Pay In Fiat invoices cannot be edited after creation.
1.2 Pay In Crypto (Static Invoice Generation)
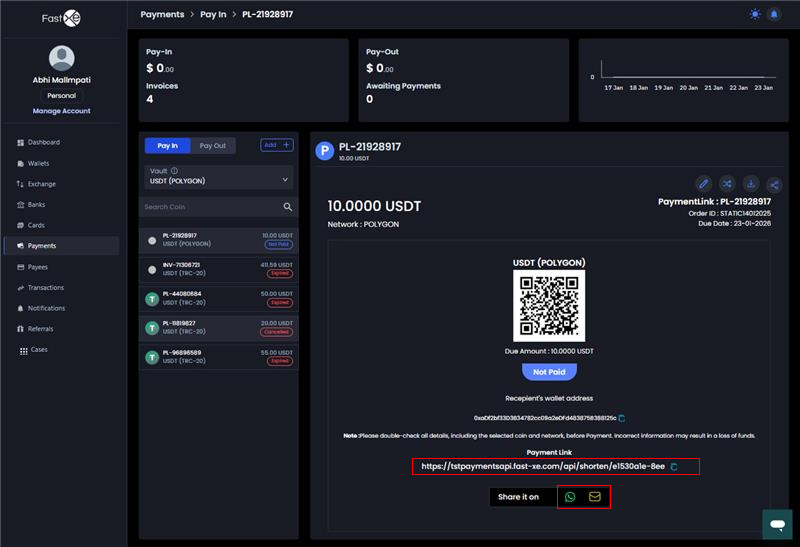
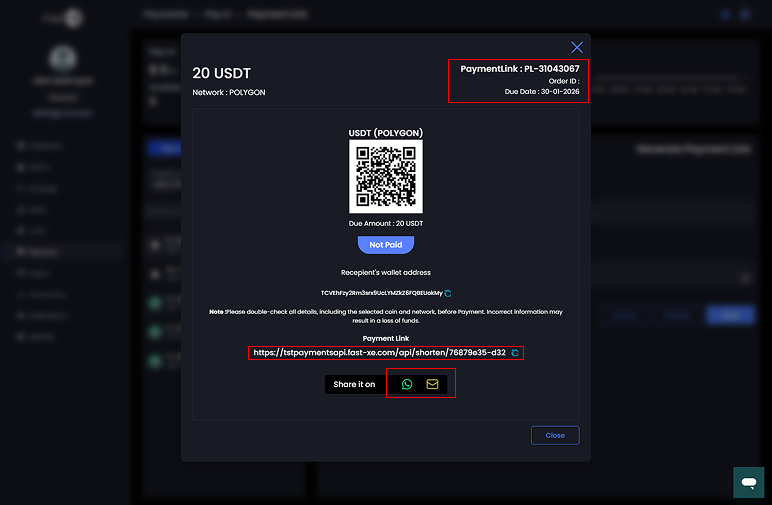
This method creates a simple crypto invoice resulting in a payment link, QR code, and wallet address.
- Initiate Invoice: Click Add and select Create Invoice.
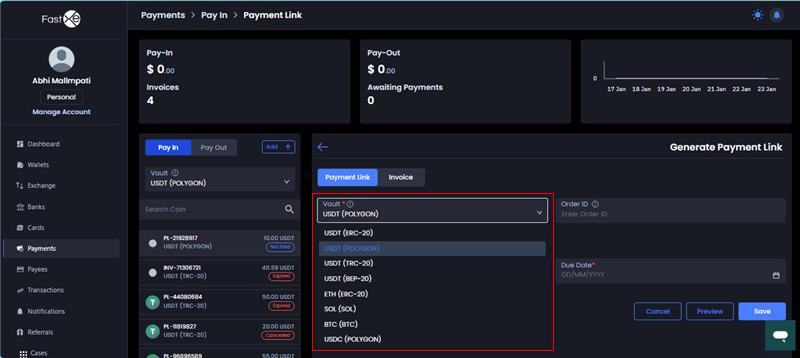
- Select Vault: Choose the Vault (wallet) where the payment will be deposited. Screenshot: Vault selection dropdown
- Enter Details: Enter the Order ID and the desired payment Amount.
- Specify Coin and Network: Select the required Coin (e.g., USDT) and the specific Network (e.g., TRC20 or ERC20) for the transaction.
- Set Due Date: Specify the Due Date by which the payment must be completed.
- Preview (Optional): Click Preview to view how the generated invoice will appear to the customer (showing QR code and address).
- Save and Share: Click Save and then share the generated link, QR code, and wallet address via WhatsApp or Email.
Screenshot: Preview/Generated Invoice showing QR code and address
1.3 Pay In Crypto (Normal/Detailed Invoice Generation)
This option is used for generating detailed invoices suitable for commercial transactions that require itemised details, taxes, and discounts.
- Initiate Invoice: Click Add and select Create Invoice.
- Select Type: Ensure the Normal Invoice option is selected (as opposed to Static).
- Enter Core Details: Fill in the Order ID, select the Vault, specify the Coin, Network, and Due Date.
- Enter Address Details: Provide the necessary Address Details.
- Add Item Details: Specify itemised Amount Details and click to add a product. For each product, define the Quantity, Unit Price, Discount amount, and Tax Percentage.
- Save and Share: Save the detailed invoice. The payment process (using the link, QR code, and Hash code submission) remains the same as the static crypto invoice.